Sitecore internationalization – Language version vs. multisite setup
When facing the challenge of delivering a website in several languages you have two basic options in Sitecore to realize this:
1. Language Versions
For this quite classic option you use the possibilities provided in Sitecore to translate a saved text of an item one-to-one. For this purpose you create a new version of the item in the respective language and insert the contents to be translated. This works the same in the page editor as well as the content editor. Required is though, that the desired language is available in the system. If the menu doesn’t contain the necessary entry, the language has to get installed. In order to do this, you navigate from the Sitecore desktop to the control panel, select ‘Globalization’ and then ‘Add a New Language’. The following dialogue box will appear:
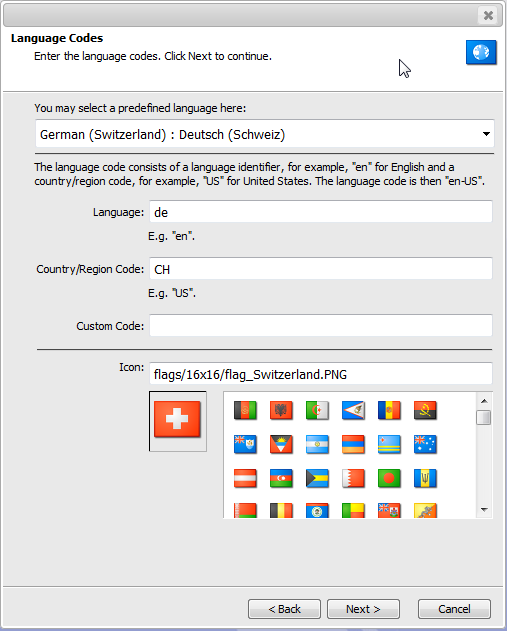
In the list of pre-defined languages you will most likely already find the one desired. If not, a few can be defined. Here, the language definition consists of the actual language code and the code for the respective country, which are separated by a hyphen. In fact this is a definition of an area diagram with a language-related and a geographical part. The geographical codes are defined in ISO 3166, the language-related ones in ISO 639. The nomenclature of the information of an area pattern is discussed extensively in RFC 5646.
Localization:
When delivering contents in different languages you have to be aware that, apart from the mere translation, other adjustments, such as date and number formats, have to be made. It is easily overlooked that the topics Internationalization (I18n) and localization (L10n) are extensive cross-section concerns, where the implementation is definitely not trivial. Especially with existing projects that are meant to be supplemented with additional languages, this can lead to unexpected problems. An example from our Sitecore experience.
Example:
A website was created for a client, which was initially only meant to be available in German. The implementation happened through our IT, the contents were created by external editors. So far, so good. After a successful launch, the client expressed the desire to operate the website in French and Italian now as well. Basically no problem. What nobody had realized until then though was that all contents had been populated in the Sitecore standard language - English. So the whole website was technically an English version with German contents. Due to the extent of the website a manual correction was out of the question. What to do now? The task was to create a German version for all items, move the contents from the English version to the German one and afterwards delete the English version. After some research it became clear that Sitecore does not support this step by default. The search for corresponding modules only brought up partial solutions. Quickly the idea was born to expand Sitecore respectively and to implement the necessary functions ourselves. And to implement a reusable solution that should become part of the Cocomore Sitecore tool box:

The experience of working with several languages has shown that it is a common source of error not to select the correct language prior to processing and therefore having entered contents in a wrong language version. Because of this, the decision for an integration in the Sitecore Ribbon is even more reasonable. The Cocomore ‘Language Tools’ offer the possibility to copy or move contents from one language to another. And all this recursive from the selected item! So this was the solution to bring our English-German website back on track with a few clicks.
Back to internationalization:
If the desired language is available in the system, it’s time to deal with the created templates. Only when working with several languages you realize the true meaning of ‘shared’ areas, where contents are divided between the languages. If you are only working with one language you will probably have too many or not enough shared, i. e. language independent fields in your templates. You just don’t notice it. Now this setting needs some special attention with the creation of new fields. While checkboxes are still unproblematic, with graphics the question definitely arises whether all languages will share the same version. Will the graphic contain text? When in doubt, you have to decide on language-specific storage, even if only redundancy is created by this. Just as well you have to pay attention to the standard values and, if necessary, translate them.
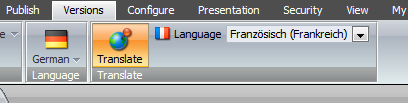
By the way: Of course afterwards the whole site has to get translated into the different languages. For this purpose, Sitecore offers a very practical ‘Translate’ display, where the fields are displayed next to each other. This way you can easily make sure that everything has been translated:
But before eagerly starting with the actual translation of the website, you should definitely check if this version of internationalization really supports all of the client’s requirements. While a direct translation of the items works well for scenarios which only deal with e. g. displaying a company website in different languages, a really international appearance of a brand with brand specific features in the individual countries is not feasible this way. As an orientation guide for the decision making process you should ask yourself if there will be structural differences between the individual sites. Is there a difference between navigation and number of pages and might those even use different specific templates? Then the decision should clearly be the second version for internationalization in Sitecore.
2. Multisite Setup
With a multisite setup each language gets its own home item. It is recommended to create an individual template that does not have a layout but the global settings and contents for the according page instead of a classic Sitecore Home template.
Here, things such as Google Analytics Code and other configurations can be hosted centrally without overloading the actual home item with information. Below this site item the structure of the respective website can be established. And of course completely independently from the other languages. If you already have an existing website and would like to add other languages, it is recommended to create a branching template based on the existing structure. This way you have a good starting point to add new language versions and to adjust them structurally and, of course, to translate them.
So how does Sitecore find the correct language version? The multisite Setup is basically independent from the actual internationalization, but provides perfect conditions to implement an international scenario. The identification of the individual sites happens here the same way as the original website. For this purpose you create a file with e. g. the name ‘sites.config’ in the ‘App_Config\includes’ register and define the additional sites there. The actual Sitecore standard ‘website’ definition can be found in the web.config file. It is a good practice to leave this file untouched and instead work with the additional files in the ‘include’ register. The configurations that can be found here are linked by Sitecore with the settings in the web.config file. To look at the result effectively and to test if the performed configuration will work, there is a special Admin URL:
http://www.example.com/sitecore/admin/showconfig.aspx
In the previously created file ‘sites.config’ you can now define the new sites:
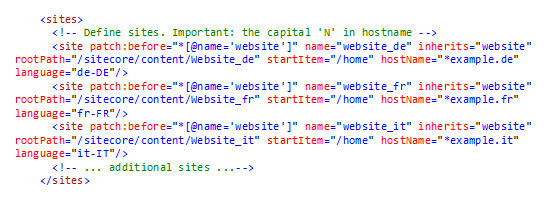
The ‘patch:before’ attribute is important. The standard Sitecore website has to appear last in the configuration. The ‘inherits’ attribute is practical. With it global matters such as settings for the caching can be centrally configured and be passed on to the other sites.
Finally, with the ‘rootPath’ attribute you specify the path to the according site item. Only with the ‘startItem’ attribute you tell Sitecore where exactly the content begins. This setting is relative to the ‘rootPath’.
Of course, these links have to be configured in IIS as well in order for it to forward the requests correctly to the Sitecore authority. For this reason the most important attribute is the ‘hostName’. Here wildcards are permitted as well, so that www.example.de and example.de can be found. Sitecore compares the ‘hostName’ attribute of the individual sites with the ‘host’ value of the inquiry header to find the matching home item. The language conversion is completely automatic here by means of the ‘language’ attribute, so no cumbersome parameter transfer is necessary.
---------------
So, this was a little excursion into the world of internationalization with Sitecore with the help of practical experiences from the real world. More about it next time.
Our expert

Miklas Bieberstein
Miklas Bieberstein works as a Software Developer, Techlead Sitecore and .NET, at Cocomore since April 2013. Bevor he worked as a Software Developer in the finance sector. At Cocomore he especially appreciates the responsibility, flexibility and creativity. What luck, that he describes himself exactly like this: responsible, flexible and creative.
Any questions or input? Reach out to our experts!
